In today’s fast-paced financial landscape, managing your money efficiently is essential. Whether you’re setting up direct deposits, authorizing automatic bill payments, or simply verifying your account details, void cheques play a crucial role. Among the various financial institutions in Canada, TD Bank stands as a reputable choice for many Canadians. In this comprehensive guide, we will delve into the intricacies of TD void cheques, exploring topics ranging from ordering cheques to locating the quintessential void check on your virtual bank account. So, let’s dive in and unlock the secrets of TD void cheques.
Ordering Physical Cheques From TD And Voiding Them
The first step towards obtaining a TD void cheque that way is placing an order. TD Bank offers multiple convenient options for ordering cheques that you can subsequently void. You can choose the method that best suits your needs, whether it be online, over the phone at 1-866-222-3456, or in person. This section will provide a detailed breakdown of each method, outlining the necessary steps and highlighting any potential considerations.
Getting Your TD Void Cheque On A Desktop Computer
If you prefer accessing banking services through your desktop computer, TD Bank offers a user-friendly online banking platform that allows you to access and download void cheques seamlessly. This section will walk you through the process of obtaining your TD Bank void cheque on a desktop computer, ensuring a smooth and hassle-free experience. By following the step-by-step instructions outlined below, you’ll be able to obtain your TD void cheque quickly and conveniently.
Step 1: Access TD Online Banking
Launch your preferred web browser on your desktop computer and navigate to the TD Bank website. Locate the online banking login section and enter your username and password to access your account.
Step 2: Navigate to the Accounts Section
Once logged in, you’ll be directed to your account dashboard. Look for the “Accounts” or “Account Summary” tab in the main menu and click on it to proceed.
Step 3: Select the Desired Account
From the list of your accounts, locate the specific TD Bank account for which you require a void cheque. Click on the account to access its details and transaction history.
Step 4: Find the “Account Details” Section
Within the account details page, search for the “Account Details” or “Account Information” section. It usually contains essential information related to your account, such as your account number, transit number, and branch number.
Step 5: Request a Void Cheque
Look for an option or link within the “Account Details” section that allows you to request or print a void cheque. The specific wording may vary, but it should be related to obtaining a void cheque for the selected account. Click on the appropriate option to proceed.
Step 6: Verify and Confirm
A new window or dialog box will appear, displaying the details of your void cheque request. Double-check that the account information and other details are accurate. If everything is correct, confirm your request to proceed.
Step 7: Download and Save the Void Cheque
After confirming your void cheque request, the online banking platform will generate a digital void cheque image. Look for a download or save option associated with the image and click on it to save the void cheque file to your computer.
Step 8: Print or Share the Void Cheque
Once the void cheque file is saved to your desktop, you can choose to print it directly using a connected printer or share it electronically via email or other methods.
Congratulations! You have successfully obtained a TD void cheque from your desktop computer using TD Bank’s online banking platform. Ensure you securely store the digital file or the printed void cheque for future use in various financial transactions.
Obtaining Your Void Cheque On The Mobile App
For the modern and on-the-go Canadian, TD Bank’s mobile app offers a convenient way to manage your finances from the palm of your hand. This section will guide you through the steps to obtain your TD Bank void cheque using the mobile app, highlighting the features and functionalities that make this process quick and effortless.
To obtain a TD Void Cheque using the mobile app, follow the step-by-step instructions outlined below:
Step 1: Launch the TD Banking App
Unlock your mobile device and locate the TD banking app on your home screen. Tap on the app icon to launch it. If you haven’t downloaded the app yet, visit your device’s app store (such as the Apple App Store or Google Play Store) and search for “TD banking.” Download and install the app onto your mobile device.
Step 2: Log in to Your TD Bank Account
Once the TD banking app is open, enter your username and password to log in to your TD Bank account. If you haven’t set up online banking access, you may need to register for TD online banking using the app or the TD Bank website.
Step 3: Navigate to the Account Details
After successfully logging in, you’ll be directed to the app’s main dashboard. Locate the section that displays your account information or account summary. This section will typically list your various TD Bank accounts.
Step 4: Select the Desired Account
From the list of your accounts, choose the specific TD Bank account for which you require a void cheque. Tap on the account to access its details and transactions.
Step 5: Access the Account Options
Within the account details screen, look for a menu or options button typically represented by three dots ( … ) or a similar symbol. Tap on this button to reveal a dropdown menu or a list of available options.
Step 6: Request a Void Cheque
Scroll through the options list until you find an option related to “Void Cheque” or “Account Details.” Tap on this option to initiate the void cheque request process.
Step 7: Verify and Confirm
A new screen will appear, displaying the details of your void cheque request. Review the information to ensure it matches the desired account and other relevant details accurately. If everything appears correct, tap on the confirmation button to proceed.
Step 8: Download or Share the Void Cheque
Upon confirming your request, the TD banking app will generate a digital void cheque image. Look for a download, save, or share option associated with the void cheque image. Tap on the appropriate button to save the void cheque image to your mobile device or share it via email, messaging apps, or other platforms as needed.
Congratulations! You have successfully obtained a TD Void Cheque through the TD banking app. Make sure to securely store the digital void cheque image or use it for various financial transactions as required.
READ NEXT: RBC Void Cheque, Explained
Finding Your Institution Number
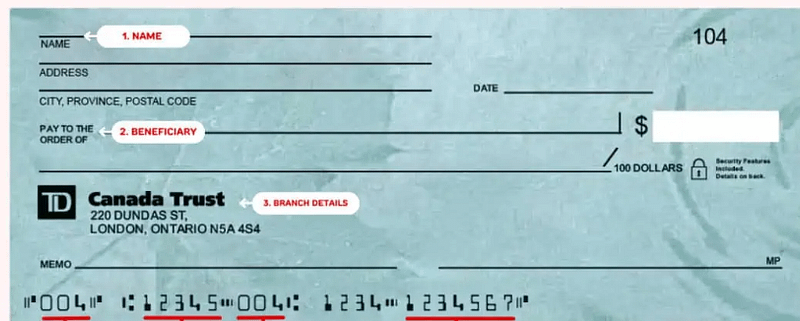
Every TD Bank account in Canada is associated with the same financial institution number: 004. which identifies the specific institution where the account is held. Locating this number is crucial when performing various financial transactions, such as setting up direct deposits or authorizing electronic transfers. This section will guide you through the process of finding your TD Bank transit number, unraveling the mystery behind this essential banking element.
Identifying Your Branch Or Transit Number
In addition to the institution number, TD Bank accounts are also linked to branch or transit numbers. These numbers further pinpoint the specific TD Bank branch associated with your account. The Branch Number is the 5 digits next to the 3-digit institution number on a real or voided cheque. Understanding how to identify your branch number is vital, as it enables efficient routing of funds and facilitates smoother financial transactions.
Discovering Your Account Number
To initiate various financial transactions, such as setting up pre-authorized debits or authorizing electronic payments, knowing your TD Bank account number is essential. Your account number is usually printed at the bottom of each cheque, following the transit and branch numbers.
The Bottom-Line
Mastering the art of TD void cheques equips you with the tools to streamline your financial transactions efficiently. Whether you’re setting up direct deposits, initiating electronic transfers, or authorizing pre-authorized debits, understanding the process of obtaining and using TD void cheques is a valuable skill. By following the comprehensive guide provided in this article, you’ll navigate the complexities of TD Bank’s void cheque system with ease. Empower yourself with knowledge, embrace technology, and take control of your financial journey with TD Bank.
READ NEXT: Desjardins Void Cheque, Explained